
Ajanta Cave 1: Life of the Buddha - Defeat of Mara
阿旃陀石窟第1窟佛傳圖之降魔成道
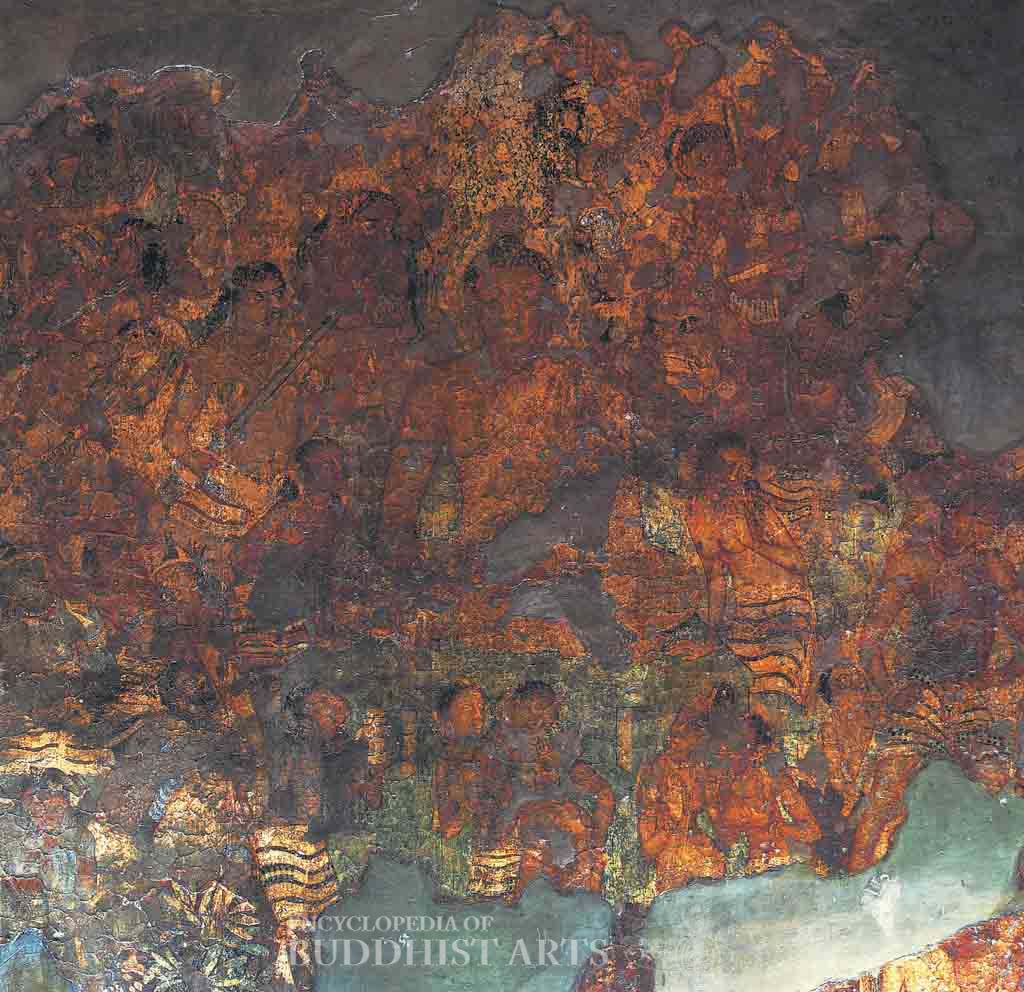
印度馬哈拉施特拉邦奧蘭加巴德
位於阿旃陀石窟(Ajanta Caves)第1窟過廳右壁。該壁布滿佛傳圖,按誕生、出家、修行、降魔成道、說法、涅槃等描繪佛的一生。此降魔成道圖描畫悉達多太子即將證悟,魔王波旬率軍擾亂,繁密的構圖與紛擾的人物,烘托出太子的穩重莊嚴,對比鮮明強烈,為該窟最傑出的壁畫之一。
畫面中央為形象高大的悉達多太子,結跏趺坐於金剛座上,入禪定三昧。右下角的魔王正指揮魔軍與魔女襲擊、誘惑太子。包圍佛座的魔軍或手執利劍,或披頭散髮,或戴豬頭,或放毒蛇。座前魔女美豔嬌柔,搔首弄姿。在喧嘩躁動中,太子沉穩自若,右手下垂作降魔印,與周遭喧鬧暴戾的氣氛形成強烈對比。
該圖戲劇性效果的表現手法,以及繁華絢麗的細部描繪,皆為當時印度藝術的典型特徵。其中佛陀、魔軍和魔女,混合運用凹凸暈染法和高光法,表現出如浮雕般的立體感。
For more details, go to the Encyclopedia of Buddhist Arts: Caves A-E, page 15.
Cite this article:
Hsingyun, et al. "Ajanta Cave 1: Life of the Buddha - Defeat of Mara." Encyclopedia of Buddhist Arts: Caves A-E, vol. 5, 2016, pp. 15.
Hsingyun, Youheng, Peter Johnson, Mankuang, Susan Huntington, Gary Edson, and Robert Neather. 2016. "Ajanta Cave 1: Life of the Buddha - Defeat of Mara" In Encyclopedia of Buddhist Arts: Caves A-E, 5:15.
Hsingyun, Youheng, Johnson, P., Mankuang, Huntington, S., Edson, G., & Neather, R.. (2016). Ajanta Cave 1: Life of the Buddha - Defeat of Mara. In Encyclopedia of Buddhist Arts: Caves A-E (Vol. 5, pp. 15).
@misc{Hsingyun2016,
author = Hsingyun and Youheng and Johnson, Peter and Mankuang and Huntington, Susan and Edson, Gary and Neather, Robert,
booktitle = {Encyclopedia of Buddhist Arts: Caves A-E},
pages = 15,
title = {{Ajanta Cave 1: Life of the Buddha - Defeat of Mara}},
volume = 5,
year = {2016}}
author = Hsingyun and Youheng and Johnson, Peter and Mankuang and Huntington, Susan and Edson, Gary and Neather, Robert,
booktitle = {Encyclopedia of Buddhist Arts: Caves A-E},
pages = 15,
title = {{Ajanta Cave 1: Life of the Buddha - Defeat of Mara}},
volume = 5,
year = {2016}}